In December 1878 Sir Bartle Frere, the British high commissioner for South Africa, issued an ultimatum to Cetshwayo, the Zulu king, that was designed to be impossible to satisfy: the Zulu were, among other things, to dismantle their “military system” within 30 days.
As expected, the ultimatum was not met, and three British columns invaded Zululand in January 1879. The centre column, led by the British commander in chief, Lord Chelmsford, crossed the Buffao (Mzinyathi) River at Rorke’s Drift, where it established a depot, and moved cautiously eastward into the Zulu kingdom. Cetshwayo’s policy was to withdraw his troops, remain on the defensive in this unprovoked war, and hope to negotiate. In particular, his soldiers were forbidden to retaliate by invading the neighbouring colony of Natal.
THE BATTLE OF RORKE'S DRIFT
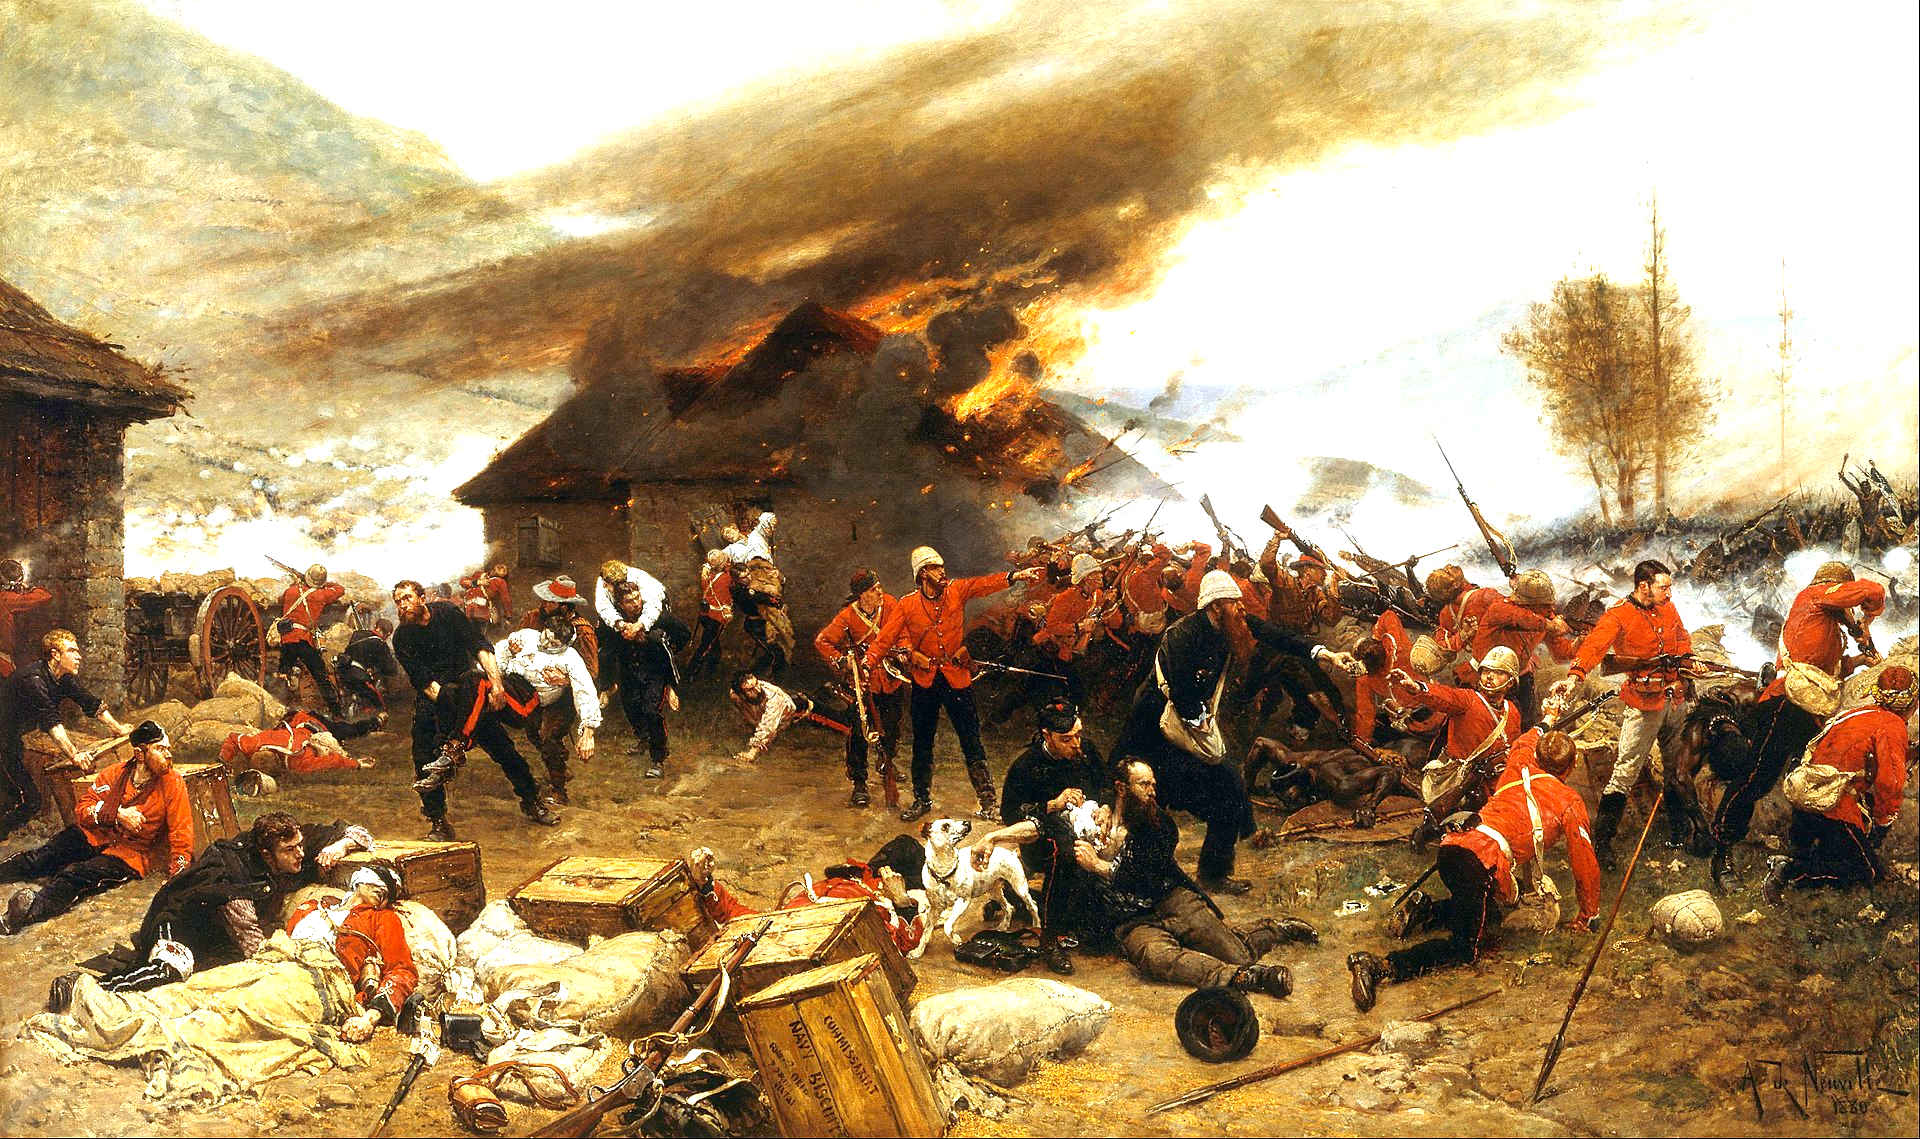
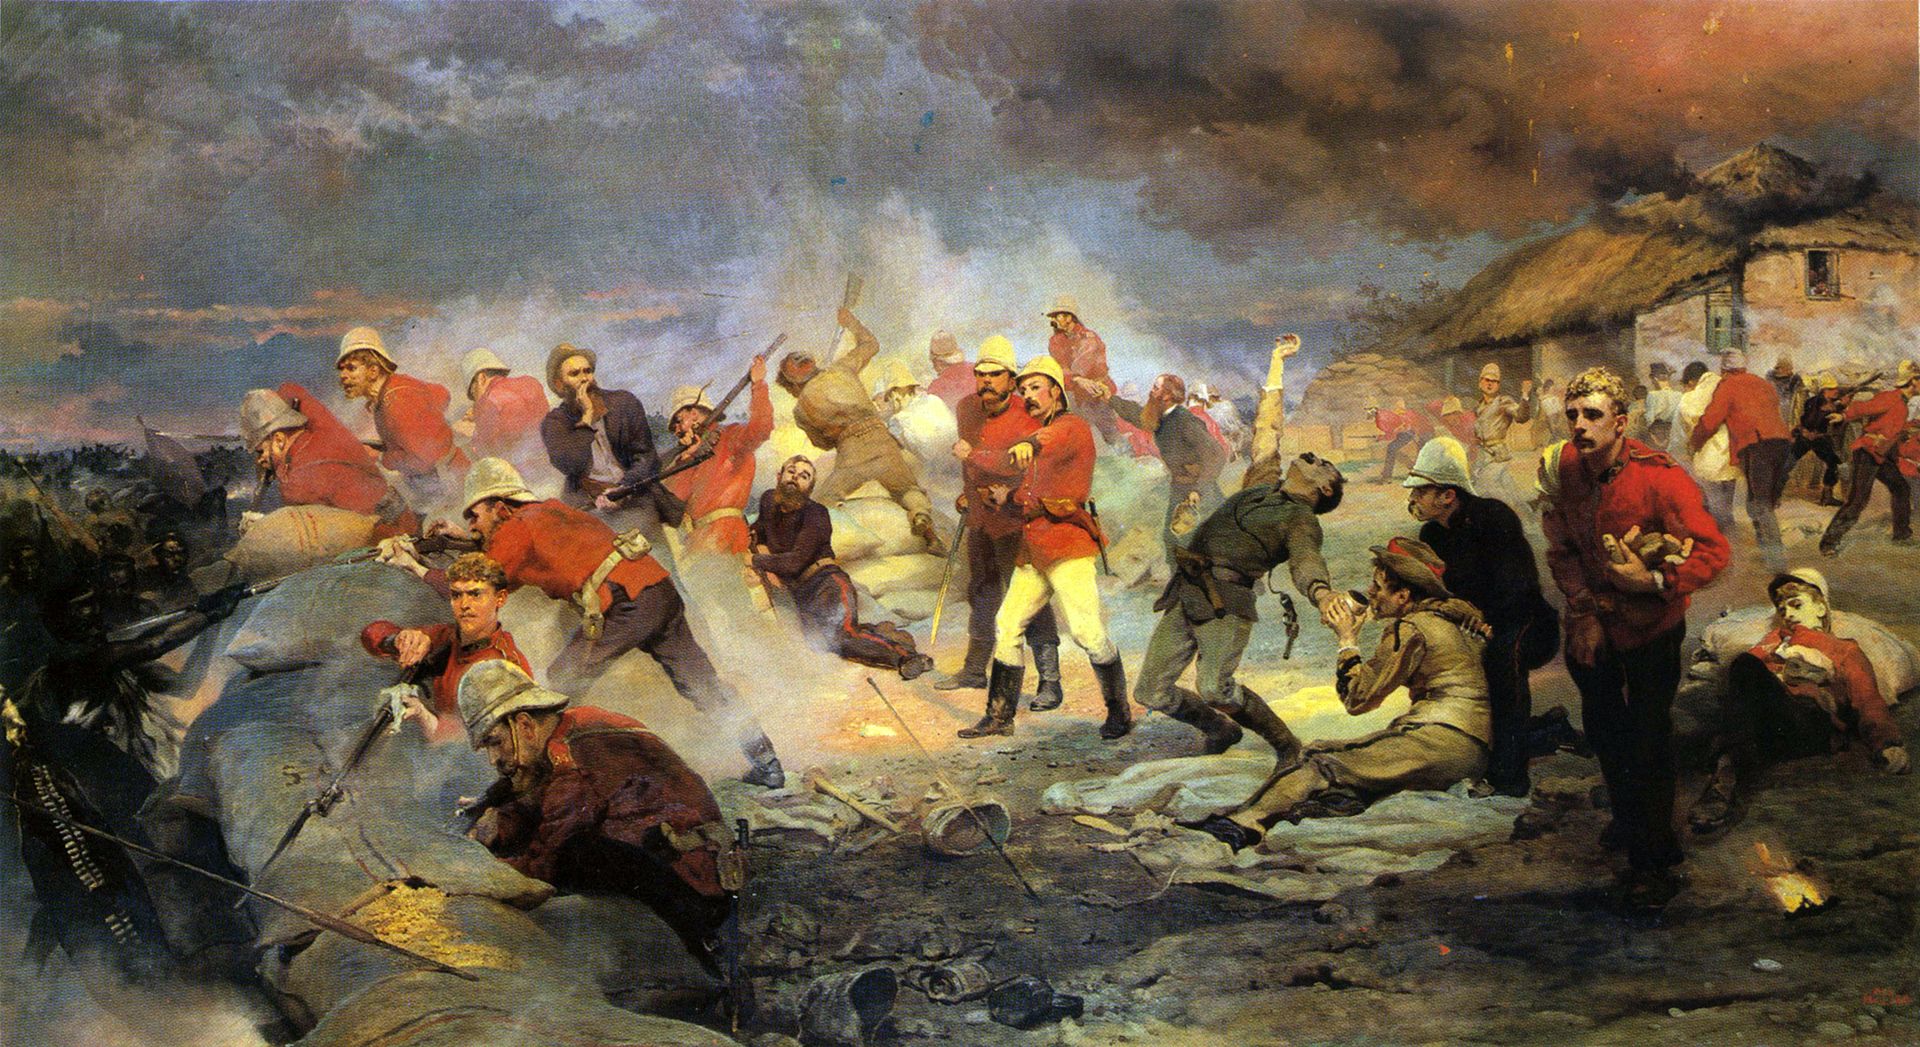
The Battle of Rorke's Drift (1879), also known as the Defence of Rorke's Drift, was an engagement in the Anglo-Zulu War. The successful British defence of the mission station of Rorke's Drift, under the command of Lieutenants John Chard of the Royal Engineers and Gonville Bromhead, 24th Regiment of Foot began when a large contingent of Zulu warriors broke off from their main force during the final hour of the British defeat at the day-long Battle of Isandlwana on 22 January 1879, diverting 6 miles (9.7 km) to attack Rorke's Drift later that day and continuing into the following day.
Just over 150 British and colonial troops defended the station against attacks by 3,000 to 4,000 Zulu warriors. The massive but piecemeal attacks by the Zulu on Rorke's Drift came very close to defeating the much smaller garrison, but were consistently repelled. Eleven Victoria Crosses were awarded among the defenders, along with a number of other decorations and honours.
Rorke's Drift, known as kwaJimu ("Jim's Land") in the Zulu language, was a mission station of the Church of Sweden, and the former trading post of James Rorke, a merchant from the eastern cape of Irish descent. It was located near a drift, or ford, on the Buffalo (Mzinyathi) River, which at the time formed the border between the British colony of Natal and the Zulu Kingdom. On 9 January 1879, the British No. 3 (Centre) Column, under Lord Chelmsford, arrived and encamped at the drift.
On 11 January, the day after the British ultimatum to the Zulus expired, the column crossed the river and encamped on the Zulu bank. A small force consisting of B Company, 2nd Battalion, 24th (2nd Warwickshire) Regiment of Foot (2nd/24th) under Lieutenant Gonville Bromhead was detailed to garrison the post, which had been turned into a supply depot and hospital under the overall command of Brevet Major Henry Spalding, 104th Foot, a member of Chelmsford's staff.
On 20 January, after reconnaissance patrolling and building of a track for its wagons, Chelmsford's column marched to Isandlwana, approximately 6 miles (9.7 km) to the east, leaving behind the small garrison. A large company of the 2nd/3rd Natal Native Contingent (NNC) under Captain William Stevenson was ordered to remain at the post to strengthen the garrison. This company numbered between 100 and 350 men.
Captain Thomas Rainforth's G Company of the 1st/24th Foot was ordered to move up from its station at Helpmekaar, 10 miles (16 km) to the southeast, after its own relief arrived, to further reinforce the position. Later that evening a portion of the No. 2 Column under Brevet Colonel Anthony Durnford, late of the Royal Engineers, arrived at the drift and camped on the Zulu bank, where it remained through the next day.
Late on the evening of 21 January, Durnford was ordered to Isandlwana, as was a small detachment of No. 5 Field Company, Royal Engineers, commanded by Lieutenant John Chard, which had arrived on the 19th to repair the pontoons that bridged the Buffalo. Chard rode ahead of his detachment to Isandlwana on the morning of 22 January to clarify his orders, but was sent back to Rorke's Drift with only his wagon and its driver to construct defensive positions for the expected reinforcement company, passing Durnford's column en route in the opposite direction.
Sometime around noon on the 22nd, Major Spalding left the station for Helpmekaar to ascertain the whereabouts of Rainforth's G Company, which was now overdue. He left Chard in temporary command. Chard rode down to the drift itself where the engineers' camp was located. Soon thereafter, two survivors from Isandlwana – Lieutenant Gert Adendorff of the 1st/3rd NNC and a trooper from the Natal Carbineers – arrived bearing the news of the defeat and that a part of the Zulu impi was approaching the station.
Upon hearing this news, Chard, Bromhead, and another of the station's officers, Acting Assistant Commissary James Dalton (of the Commissariat and Transport Department), held a quick meeting to decide the best course of action – whether to attempt a retreat to Helpmekaar or to defend their current position. Dalton pointed out that a small column, travelling in open country and burdened with carts full of hospital patients, would be easily overtaken and defeated by a numerically superior Zulu force, and so it was soon agreed that the only acceptable course was to remain and fight.

....
THE BATTLE
At about 4:20 p.m., the battle began with Lieutenant Henderson's NNH troopers, stationed behind the Oscarberg, briefly engaging the vanguard of the main Zulu force. However, tired from the battle at Isandlwana and retreat to Rorke's Drift as well as being short of carbine ammunition, Henderson's men departed for Helpmekaar. Henderson himself reported to Lieutenant Chard the enemy were close and that "his men would not obey his orders but were going off to Helpmekaar".
Henderson then followed his departing men. Upon witnessing the withdrawal of Henderson's NNH troop, Captain Stevenson's NNC company abandoned the cattle kraal and fled, greatly reducing the strength of the defending
garrison. Outraged that Stevenson and some of his colonial NCOs also fled from the barricades, a few British soldiers fired after them, killing Corporal William Anderson.
With the Zulus nearly at the station, the garrison now numbered between 154 and 156 men. Of these, only Bromhead's company could be considered a cohesive unit. Additionally, up to 39 of his company were at the station as hospital patients, although only a handful of these were unable to take up arms. With fewer men, Chard realised the need to modify the defences, and gave orders that biscuit boxes be used to construct a wall through the middle of the post in order to make possible the abandonment of the hospital side of the station if the need arose.
At 4:30 p.m., the Zulus rounded the Oscarberg and approached the south wall. Private Frederick Hitch, posted as lookout atop the storehouse, reported a large column of Zulus approaching. The Zulu vanguard, 600 men of the iNdluyengwe, attacked the south wall, which joined the hospital and the storehouse. The British opened fire when the Zulus were 500 yards (460 m) away.
The majority of the attacking Zulu force moved around to attack the north wall, while a few took cover and were either pinned down by continuing British fire or retreated to the terraces of Oscarberg. There they began a harassing fire of their own. As this occurred, another Zulu force continued to the hospital and northwestern wall.
Those British on the barricades – including Dalton and Bromhead – were soon engaged in fierce hand-to-hand fighting. The British wall was too high for the Zulus to scale, so they resorted to crouching under the wall, trying to get hold of the defenders' Martini–Henry rifles, slashing at British soldiers with assegais or firing their weapons through the wall. At places, they clambered over each other's bodies to drive the British off the walls but were driven back.
Zulu fire, both from those under the wall and around the Oscarberg, inflicted a few casualties, and five of the 17 defenders who were killed or mortally wounded in the action were struck while at the north wall.
DEFENCE OF THE HOSPITAL
Chard realised that the north wall, under near constant attack from the Zulus, could not be held. At 6:00 p.m., he pulled his men back into the yard, abandoning the front two rooms of the hospital in the process. The hospital was becoming untenable; the loopholes had become a liability, as rifles poking out were grabbed at by the Zulus, yet if the holes were left empty, the Zulu warriors stuck their own weapons through in order to fire into the rooms. Among the soldiers assigned to the hospital were Corporal William Wilson Allen and Privates Cole, Dunbar, Hitch, Horrigan, John Williams, Joseph Williams, Alfred Henry Hook, Robert Jones, and William Jones.
Privates Horrigan, John Williams, Joseph Williams and other patients tried to hold the hospital entrance with rifles and fixed bayonets. Joseph Williams defended a small window, and 14 dead Zulus were later found beneath that window. As it became clear the front of the building was being taken over by Zulus, John Williams began to hack a way of escape through the wall dividing the central room and a corner room in the back of the hospital. As he made a passable breach, the door into the central room came under furious attack from the Zulus, and he had time only to drag two bedridden patients out before the door gave way.
The corner room into which John Williams had pulled the two patients was occupied by Private Hook and another nine patients. John Williams hacked at the wall to the next room with his pick-axe, as Hook held off the Zulus. A firefight erupted as the Zulus fired through the door and Hook returned fire – an assegai striking his helmet and stunning him.
Williams made the hole big enough to get into the next room, occupied only by patient Private Waters, and dragged the patients through. The last man out was Hook, who killed some Zulus who had knocked down the door before he dived through the hole. John Williams once again went to work, spurred on by the fact that the roof was now ablaze, as Hook defended the hole and Waters continued to fire through a loophole.
After 50 minutes, the hole was large enough to drag the patients through, and most of the men were now in the last room, defended by Privates Robert Jones and William Jones. From here, the patients clambered out through a window and then made their way across the yard to the barricade. Privates Waters and Beckett hid in the wardrobe, Waters was wounded and Beckett died of assegai wounds.
Of the 11 patients, nine survived the trip to the barricade, as did all the able-bodied men. According to James Henry Reynolds, four defenders were killed in the hospital: one was a member of the Natal Native Contingent with a broken leg; Sergeant Maxfield and Private Jenkins, who were ill with fever and refused to be moved were also killed. Reportedly, Jenkins was killed after being seized and stabbed, together with Private Adams who also refused to move. Private Cole, assigned to the hospital, was killed when he ran outside. Another hospital patient killed was Trooper Hunter of the Natal Mounted Police. Among the hospital patients who escaped were a Corporal Mayer of the NNC; Bombardier Lewis of the Royal Artillery, and Trooper Green of the Natal Mounted Police, who was wounded in the thigh by a bullet. Private Conley, with a broken leg, was pulled to safety by Hook, although Conley's leg was broken again in the process.
CATTLE KRAAL AND BASTION
The evacuation of the burning hospital completed the shortening of the perimeter. As night fell, the Zulu attacks grew stronger. The cattle kraal came under renewed assault and was evacuated by 10:00 p.m., leaving the remaining men in a small bastion around the storehouse. Throughout the night, the Zulus kept up a constant assault against the British positions; Zulu attacks began to slacken only after midnight, ending by 2:00 a.m., and replaced by harassing fire from Zulu firearms until 4:00 a.m.
By that time, the garrison had sustained 14 dead. Two more were mortally wounded and eight more – including Dalton – were seriously wounded. Almost every man had some kind of wound. They were all exhausted, having fought for the better part of 10 hours and were running low on ammunition. Of 20,000 rounds in reserve at the mission, only 900 remained.
AFTERMATH
As dawn broke, the British could see that the Zulus were gone; all that remained were the dead and severely
wounded. Patrols were dispatched to scout the battlefield, recover rifles, and look for survivors, many of whom were killed when found. At roughly 7:00 a.m., an impi of Zulus suddenly appeared, and the British manned their positions again.
No attack materialised, however, as the Zulus had been on the move for six days prior to the battle and had not eaten properly for two. In their ranks were hundreds of wounded, and they were several days' march from any supplies. Soon after their appearance, the Zulus left the way they had come.
Around 8:00 a.m., another force appeared, and the defenders left their breakfast to man their positions again. However, the force turned out to be the vanguard of Lord Chelmsford's relief column.
Breakdown of British and colonial casualties:
1st/24th Foot: 4 killed or mortally wounded in action; 2 wounded
2nd/24th Foot: 9 killed or mortally wounded in action; 9 wounded
Commissariat and Transport Department: 1 killed in action; 1 wounded
Natal Mounted Police: 1 killed in action; 1 wounded
1st/3rd NNC: 1 killed in action
2nd/3rd NNC: 1 killed; 2 wounded
After the battle 351 Zulu bodies were counted, but it has been estimated that at least 500 wounded and captured Zulus might have been massacred as well. Having witnessed the carnage at Isandlwana, the members of Chelmsford's relief force had no mercy for the captured, wounded Zulus they came across, nor did the station's defenders. Trooper William James Clarke of the Natal Mounted Police described in his diary that "altogether we buried 375 Zulus and some wounded were thrown into the grave. Seeing the manner in which our wounded had been mutilated after being dragged from the hospital ... we were very bitter and did not spare wounded Zulus". Laband, in his book The Zulu Response to the British Invasion of 1879, accepts the estimate of 600 that Shepstone had from the Zulus.
Samuel Pitt, who served as a private in B Company during the battle, told The Western Mail in 1914 that the official enemy death toll was too low: "We reckon we had accounted for 875, but the books will tell you 400 or 500". Lieutenant Horace Smith-Dorrien, a member of Chelmsford's staff, wrote that the day after the battle an improvised gallows was used "for hanging Zulus who were supposed to have behaved treacherously."
MEDALS
Eleven Victoria Crosses were awarded to the defenders of Rorke's Drift, seven of them to soldiers of the 2nd/24th Foot – the most ever received for a single action by one regiment. (The most awarded in a day is 16 for actions at the Battle of Inkerman, on 5 November 1854; in a single action, 28 were awarded as a result of the Second Relief of Lucknow, 14–22 November 1857). Four Distinguished Conduct Medals were also awarded.
This high number of awards for bravery has been interpreted as a reaction to the earlier defeat at the Battle of Isandlwana – the extolling of the victory at Rorke's Drift drawing the public's attention away from the great defeat at Isandlwana and the fact that Lord Chelmsford and Henry Bartle Frere had instigated the war without the approval of Her Majesty's Government.
Sir Garnet Wolseley, taking over as commander-in-chief from Lord Chelmsford later that year, was unimpressed with the awards made to the defenders of Rorke's Drift, saying "it is monstrous making heroes of those who, shut up in buildings at Rorke's Drift, could not bolt and fought like rats for their lives, which they could not otherwise save".
Several historians have challenged this assertion and pointed out that the victory stands on its own merits, regardless of other concerns. Victor Davis Hanson responded to it directly in Carnage and Culture (also published as Why the West Has Won), saying, "Modern critics suggest such lavishness in commendation was designed to assuage the disaster at Isandhlwana and to reassure a skeptical Victorian public that the fighting ability of the British soldier remained unquestioned. Maybe, maybe not, but in the long annals of military history, it is difficult to find anything quite like Rorke's Drift, where a beleaguered force, outnumbered 40 to one, survived and killed 20 men for every defender lost".
THE VICTORIA CROSS
- Lieutenant John Rouse Merriott Chard, 5th Field Coy, Royal Engineers
- Lieutenant Gonville Bromhead; B Coy, 24th (The 2nd Warwickshire) Regiment of Foot (2nd/24th Foot)
- Corporal William Wilson Allen; B Coy, 2nd/24th Foot
- Private Frederick Hitch; B Coy, 2nd/24th Foot
- Private Alfred Henry Hook; B Coy, 2nd/24th Foot
- Private Robert Jones; B Coy, 2nd/24th Foot
- Private William Jones; B Coy, 2nd/24th Foot
- Private John Williams; B Coy, 2nd/24th Foot
- Surgeon-Major James Henry Reynolds; Army Medical Department
- Acting Assistant Commissary James Langley Dalton; Commissariat and Transport Department
- Corporal Christian Ferdinand Schiess; 2nd/3rd Natal Native Contingent
In 1879 there was no provision for the posthumous granting of the Victoria Cross, and so it could not be awarded to anyone who had died in performing an act of bravery. Private Joseph Williams, B Coy, 2nd/24th Foot, was killed during the fight in the hospital and was mentioned in despatches that "had he lived he would have been recommended for the Victoria Cross."
DISTINGUISHED CONDUCT MEDAL
- Gunner John Cantwell; N Batt, 5th Brig Royal Horse Artillery (demoted from bombardier wheeler the day before the battle)
- Private John William Roy; 1st/24th Foot
- Colour Sergeant Frank Edward Bourne; B Coy, 2nd/24th Foot
- Second Corporal Francis Attwood; Army Service Corps
On 15 January 1880, a submission for a DCM was also made for Private Michael McMahon (Army Hospital Corps). The submission was cancelled on 29 January 1880 for absence without leave and theft.

Queen Elizabeth
and King
Charles were/are heads of state of the Commonwealth
nations.
South
Africa ...
REFERENCE
https://

